CAN bus breakout boards - What, Why, How?
Over the past year or so, I’ve seen more and more people opt for adding a CAN enabled expansion board, typically to their tool head. The claim was that it would simplify wiring, eliminating a number of cables that extend from the main controller board to the extruder, hot-end, and end-stop switches.
While I was interested in simplifying my wiring situation, I’d always been a bit put off by what I perceived to be some significant additional complexity in setting up a CAN enabled breakout board. Well, my wiring situation recently became a bit unstable and started to see some unexpected thermistor issues with my Rapido hot-end that I knew were attributed to too much stress on the cables. It was time to take the plunge.
Good news is, yes, my wiring from toolhead to main board is definitely cleaner/simpler. I’m down to 5 wires 2 for CAN, 2 for power, and 1 USB for my beacon probe…
Yes it was somewhat challenging to setup and configure, hopefully the information here helps others!
Yes I think it’s a worthwhile modification, and would definitely do it again as part of my standard build.
Additional potholes:
- Re-crimping everything at the tool-head including:
- hot-end thermistor, heat block and cooling fan
- direct drive stepper motor
- end-stop switch
- part cooling fans
- Creating a custom mount for the EBB36 breakout board. I use a custom EVA tool carriage, and surprise, the breakout board wouldn’t fit conveniently on the back of the stepper motor as in typical setups. This included modifying the EVA backplate and strain relief bracket.
Configuration / Setup Overview
- Build Klipper with support for USB to CAN bus bridge (no need for CanBoot on Octopus)
- Flash Octopus with updated klipper config
- Update RaspberryPi with CAN network interface
- Discover Octopus CAN bus UUID and update
printer.cfg - Build CanBoot firmware for EBB36
- Flash CanBoot onto EBB36
- Create cabling to connect EBB36 to Octopus
- Flash Klipper to EBB36 over CAN bus
- Add EBB36 MCU to
printer.cfg - Profit
What is CanBoot?
- CanBoot is firmware that allows one to install Klipper firmware over a CAN network
- You’ll want to install CanBoot on CAN bus boards making it more convenient to install and upgrade Klipper firmware
- Without it you would need to connect to the board via USB, boot the toolhead into DFU mode and Flash
- With it you can flash from the RaspberryPi using the
flash_can.pyutility over the CAN bus network
- I didn’t install CanBus on the Octopus, however, it may be helpful if you can flash it directly from the RaspberryPi (like EBB36), eliminating the need to do the SD Card shuffle… I haven’t tested this idea yet!
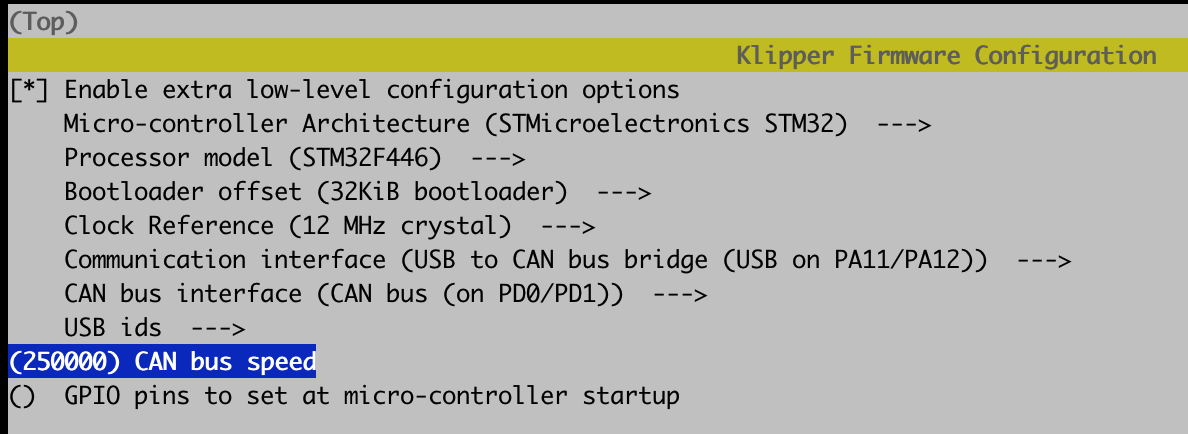
Create firmware with USB to CAN bus bridge support:
Original configuration: Klipper notes > Octopus Klipper config
New configuration settings:
STMicroelectrnics STM32
STM32F446
32KiB Bootloader
12Mhz Clock
Communications for interface (USB to CAN bus bridge (USB on PA11/PA12))
CAN bus interface (CAN bus on (PD0/PD1))
(250000) CAN bus speed
make clean
make
[!USB and CAN Pins] USB and CAN bus Pins can be found in BIGTREETECH-OCTOPUS-V1.0 · GitHub
CAN bus speed should match all other CAN connected devices - changing from default 500000 to 250000 There are several different STM32 processors on the Octopus - you should verify and ensure correct setting here…
Flash Octopus with updated Firmware
- Copy newly generated firmware from Raspberry Pi to a local computer
scp pi@mainsail.lmnt.local:/home/pi/klipper/out/klipper.bin ~/Downloads/
- Power off printer
- Remove SD Card from Octopus
- Connect SD Card to computer you copied the new firmware build to
- Copy klipper.bin to SD Card and rename it to firmware.bin
- Eject the SD Card and Put it back in Octopus board
- Power on printer - wait
[!NOTE] At this point it will appear that things are no longer working, if you’re really curious if the Firmware update worked, you’ll have to shutdown the Octopus, take out the SD Card and see if the firmware.bin was deleted and replaced with a FIRMWARE.CUR
In order to reconnect things youll need to configure the RaspberryPI to talk to the board over the USB - CAN bridge instead of the
/dev/serial/by-id/***
Configure Raspberry PI CAN interface
Create the can0 network interface:
sudo vi /etc/network/interfaces.d/can0
allow-hotplug can0
iface can0 can static
 bitrate 250000
 pre-up ip link set can0 type can bitrate 250000
 pre-up ip link set can0 txqueuelen 1024
 up ifconfig $IFACE txqueuelen 1024
Restart networking and ensure the CAN0 interface is up:
sudo service networking restart
sudo ifup can0
 $ ifconfig can0
can0: flags=193<UP,RUNNING,NOARP>  mtu 16
        unspec 00-00-00-00-00-00-00-00-00-00-00-00-00-00-00-00  txqueuelen 1024  (UNSPEC)
        RX packets 5973  bytes 44435 (43.3 KiB)
        RX errors 0  dropped 0  overruns 0  frame 0
        TX packets 832  bytes 4922 (4.8 KiB)
        TX errors 0  dropped 0 overruns 0  carrier 0  collisions 0
Query CAN Network
cd /CanBoot/scripts
python3 flash_can.py -i can0 -q
[!NOTE] At this point you may want to reboot the Raspberry Pi just to ensure that networking starts up as expected
Update printer.cfg
[mcu]
#serial: /dev/serial/by-id/usb-Klipper_stm32f446xx_0A001A000A50534E4E313020-if00
canbus_uuid: b1382ad2b4b4
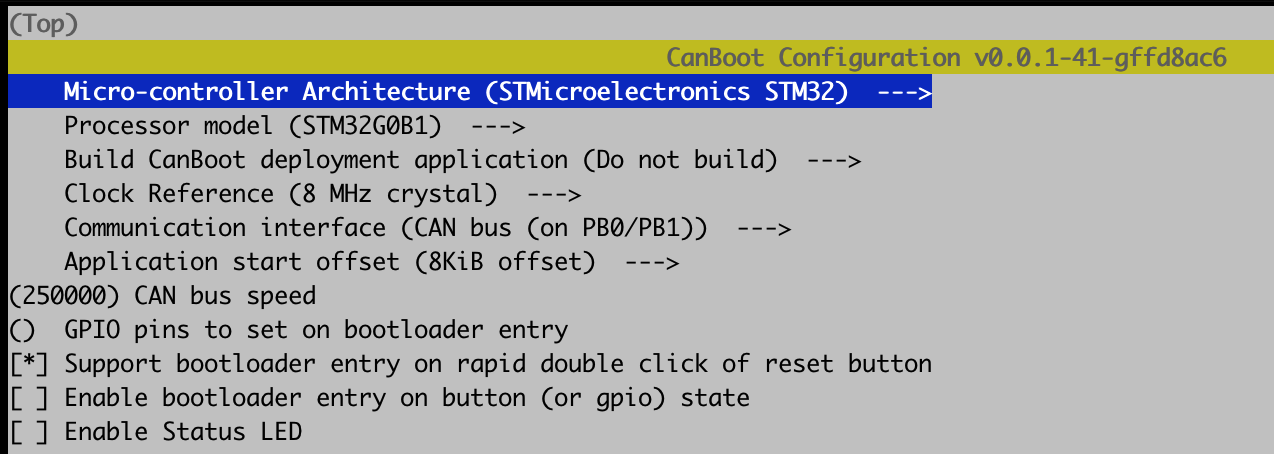
Create CAN Boot firmware for EBB36
pi@mainsail:~/ $
pi@mainsail:~/ $ git clone
pi@mainsail:~/ $ cd CanBoot
pi@mainsail:~/CanBoot $ make menuconfig
- Install jumper to enable board power via USB
- Connect toolhead to RaspberryPi via USB
- Ensure you can see the device (non-dfu mode)
lsusbshould show the following when not in DFU modepi@mainsail:~/CanBoot $ lsusb Bus 002 Device 001: ID 1d6b:0003 Linux Foundation 3.0 root hub Bus 001 Device 009: ID 04d8:e72b Microchip Technology, Inc. >> Bus 001 Device 010: ID 1d50:614e OpenMoko, Inc. Bus 001 Device 007: ID 1bcf:0215 Sunplus Innovation Technology Inc. Bus 001 Device 002: ID 2109:3431 VIA Labs, Inc. Hub Bus 001 Device 001: ID 1d6b:0002 Linux Foundation 2.0 root hub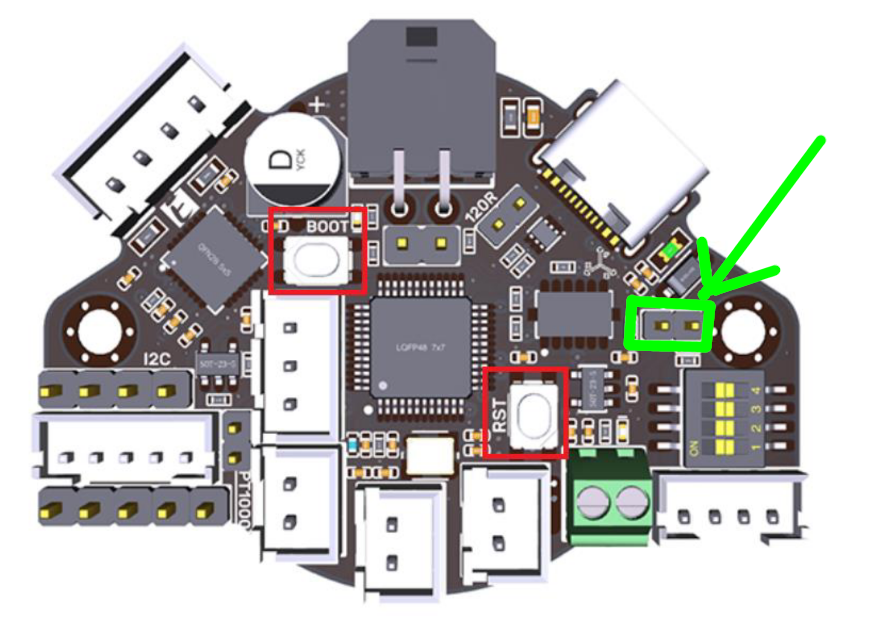
- Reboot the toolhead board in DFU mode for flashing
- 1Hold the RESET button and BOOT shown above
- Release Reset
- Release Boot
- 1Hold the RESET button and BOOT shown above
lsusbshould show the device in DFU mode - get the device ID (0483:df11) from the outputpi@mainsail:~/CanBoot $ lsusb Bus 002 Device 001: ID 1d6b:0003 Linux Foundation 3.0 root hub Bus 001 Device 009: ID 04d8:e72b Microchip Technology, Inc. >> Bus 001 Device 011: ID 0483:df11 STMicroelectronics STM Device in DFU Mode Bus 001 Device 007: ID 1bcf:0215 Sunplus Innovation Technology Inc. Bus 001 Device 002: ID 2109:3431 VIA Labs, Inc. Hub Bus 001 Device 001: ID 1d6b:0002 Linux Foundation 2.0 root hub
Flash the CAN Boot firmware
sudo dfu-util -a 0 -D ~/CanBoot/out/canboot.bin --dfuse-address 0x08000000:force:mass-erase:leave -d 0483:df11
pi@mainsail:~/CanBoot $ sudo dfu-util -a 0 -D ~/CanBoot/out/canboot.bin --dfuse-address 0x08000000:force:mass-erase:leave -d 0483:df11
[sudo] password for pi:
dfu-util 0.9

Copyright 2005-2009 Weston Schmidt, Harald Welte and OpenMoko Inc.
Copyright 2010-2016 Tormod Volden and Stefan Schmidt
This program is Free Software and has ABSOLUTELY NO WARRANTY
Please report bugs to http://sourceforge.net/p/dfu-util/tickets/

dfu-util: Invalid DFU suffix signature
dfu-util: A valid DFU suffix will be required in a future dfu-util release!!!
Opening DFU capable USB device...
ID 0483:df11
Run-time device DFU version 011a
Claiming USB DFU Interface...
Setting Alternate Setting #0 ...
Determining device status: state = dfuIDLE, status = 0
dfuIDLE, continuing
DFU mode device DFU version 011a
Device returned transfer size 1024
DfuSe interface name: "Internal Flash   "
Performing mass erase, this can take a moment
Downloading to address = 0x08000000, size = 4152
Download	[=========================] 100%         4152 bytes
Download done.
File downloaded successfully
dfu-util: Error during download get_status
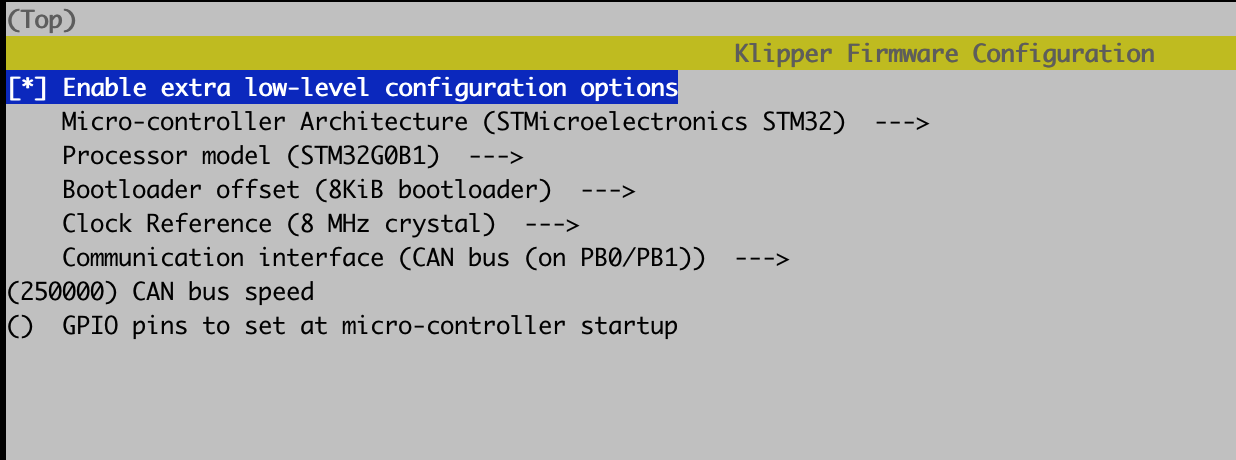
Make Klipper firmware for the Toolboard
Make Klipper Firmware for EBB36 Device - verify your Processor model!!
cd ~/klipper
make menuconfig
make clean
make
Discover Device EBB36 CAN device UUID
$ ~/klippy-env/bin/python ~/klipper/scripts/canbus_query.py can0
Found canbus_uuid=2c3dfa09d234, Application: CanBoot
Total 1 uuids found
Flash Klipper to EBB36 over CAN BOOT
python3 ~/CanBoot/scripts/flash_can.py -i can0 -f ~/klipper/out/klipper.bin -u MYUUID
pi@mainsail:~/klipper $ ~/klippy-env/bin/python ~/klipper/scripts/canbus_query.py can0
Found canbus_uuid=2c3dfa09d234, Application: CanBoot
Total 1 uuids found

pi@mainsail:~/klipper $python3 ~/CanBoot/scripts/flash_can.py -i can0 -f ~/klipper/out/klipper.bin -u 2c3dfa09d234

Sending bootloader jump command...
Resetting all bootloader node IDs...
Checking for canboot nodes...
Detected UUID: 2c3dfa09d234, Application: CanBoot
Attempting to connect to bootloader
CanBoot Connected
Protocol Version: 1.0.0
Block Size: 64 bytes
Application Start: 0x8002000
MCU type: stm32g0b1xx
Verifying canbus connection
Flashing '/home/pi/klipper/out/klipper.bin'...

[##################################################]

Write complete: 13 pages
Verifying (block count = 413)...

[##################################################]

Verification Complete: SHA = 03162D5DC012B2A63CF3D1130D598AD07BEAB251
CAN Flash Success
Add EBB36 MCU to printer.cfg
[mcu EBB36]
canbus_uuid: 2c3dfa09d234
References
How to Use CAN Toolhead Boards Connected Directly to Octopus.pdf Setup EBB36 v1.2 connected to Octopus pro - General Discussion - Klipper