
Thanks for your interest in this Max For Live plugin for Ableton. Hopefully you find that it further inspires the creative use of the otherworldly Hologram Microcosm effects unit!
This plugin is in no way affiliated with Hologram Electronics, rather, it’s a personal project built by me used to interface with Microcosm while making music in Ableton!
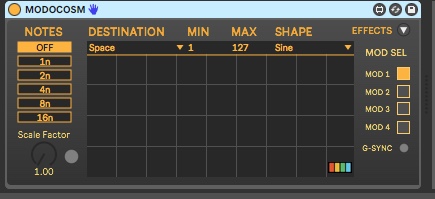
By now you’ve probably already read a bit about what MODOCOSM does and are interested in getting it going for yourself. You’ve come to the right place!
A Guided Tour
Here’s a YouTube video walking you through the setup of MODOCOSM and about 15 minutes of an audio demo with a few simple loops. Leave some coments and let me know what you think! For those who’d rather skip the video, I’ve written up a quick start guide below which will walk you through the setup.
Prerequisites
- This plugin was written using Max For Live, I believe you need to have Ableton Suite in order to use Max For Live plugins! I’m sorry if it doesn’t work with Ableton Standard, I was a Standard user for a while until they had a good discount on updating to Ableton 11…
- You need to have a Microcosm effects box for this to do much of anything as intended!
- You need a way of patching your Microcosm effects unit into your computer / Ableton. I use a Scarlett 18i8 external audio interface for this purpose and have patched the Microcosm ins/outs through it.
- Your Microcosm device needs to be connected to Ableton via MIDI - I’ll cover how I have mine setup below.
- Have an inquisitive and open mind.
Configure your Microcosm
- Not much to do here, enter setup mode and specify the MIDI channel it should be listening on. Check out the Global Configuration section of the Microcosm User Manual for more information.
- While you’re in setup mode ensure the Input/Output Mode is configured as desired (stereo sounds great)
Download and Install MODOCOSM
- Download MODOCOSM from the Max For Live site
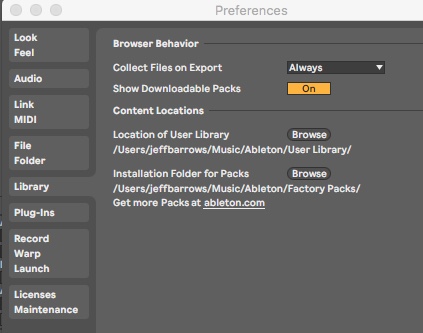
- Locate the downloaded file and move it to your Ableton -> User Library -> Presets -> MIDI Effects -> Max MIDI Effects folder. You can find the location of this folder on your computer by opening the Ableton Preferences -> Library tab.
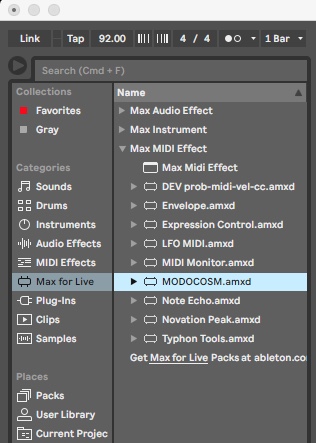
- You should now see the MODOCOSM.amxd plugin appear under the MIDI Effects folder in the Max For Live plugins section of Ableton.
Configure Microcosm in Ableton
There are a few ways to integrate external effects processors with Ableton. Ableton has a guide on Using External Audio Effects you should check out and decide which option best fits your studio setup.
I’ve tried setting it up as both an ‘insert effect’, and as a ‘return channel’. I prefer using it as part of a return channel so that I can pass any / many instrument through it just as I would with other Ableton effects like the standard reverb and delay sends. In my demos I’ll be showing the ‘return channel’ configuration option.
Here are a few screenshots:
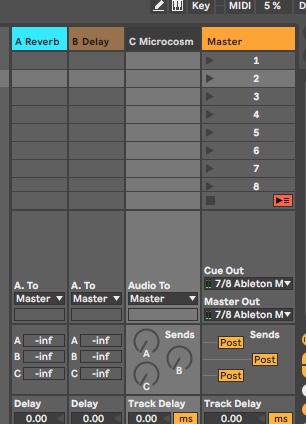

Create new MIDI track for the Microcosm
- Create a new MIDI track, rename it to something meaningful to you, I use
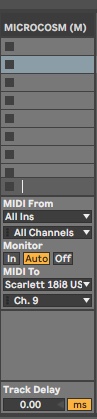
MICROCOSM (M). I add the (M) to the name to make it easy to see at a glance if it’s an Audio or MIDI track. - Configure the MIDI track with the destination device and MIDI channel of your Microcosm device. My Microcosm is connected to Ableton via a MIDI Through port on a synth connected to the Scarlett audio interface, I’ve configured the Microcosm to listen on MIDI Channel 9.
Add MODOCOSM MIDI effect
- Simply drag the MODOCOSM.amxd Max MIDI Effect plugin onto the newly created
MICROCOSM (M)MIDI track, it should show up in the Instrument/Sample window below the tracks.
- And that’s about all it takes!
It’s time to get lost! =)
Time to explore… WARNING!: Time will start slipping away from you at this point. I’m easily able to spend hours at a time listening to the different sounds that emerge from this magical Microcosm effects unit.